Ansible VS Code Extension by Red Hat
This extension adds language support for Ansible to Visual Studio Code and OpenVSX compatible editors by leveraging ansible-language-server.
Language association to yaml files
The extension works only when a document is assigned ansible language. The
following method is used to assign ansible language to the document opened by
the extension:
Without file inspection
- yaml files under
/playbooksdir. - files with the following double extension:
.ansible.ymlor.ansible.yaml. - notable yaml names recognized by ansible like
site.ymlorsite.yaml - yaml files having playbook in their filename:
*playbook*.ymlor*playbook*.yaml
Additionally, in VS Code, you can add persistent file association for language
to settings.json file like this:
With file inspection
File inspection for ansible keywords
- Primary method is inspection for top level playbook keywords like hosts and import_playbook in yaml files.
Modelines (optional)
- The extension also supports the usage of modelines and when used, it is given highest priority and language is set according to modelines. Example and syntax of modelines:
Rest all the .yml, or .yaml files will remain yaml by default unless the user explicitly changes the language to ansible for which the process is mentioned below.
Activating Red Hat Ansible extension manually
It is recommended to open a folder containing Ansible files with a VS Code workspace.
Note:
- For Ansible files open in an editor window ensure the language mode is set to
Ansible(bottom right of VS Code window). - The runtime status of extension should be in activate state. It can be
verified in the
ExtensionwindowRuntime Statustab forAnsibleextension.
Features
Syntax highlighting
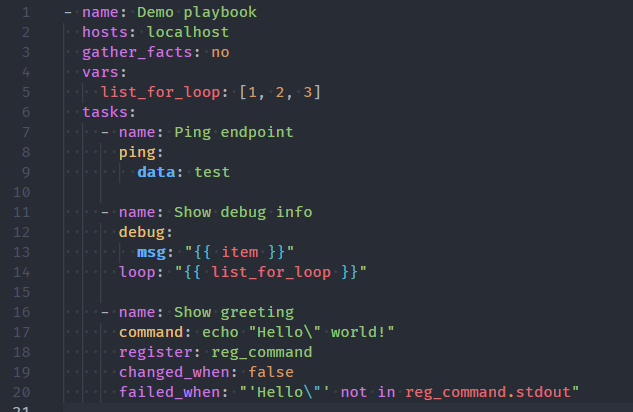
Ansible keywords, module names and module options, as well as
standard YAML elements are recognized and highlighted distinctly. Jinja
expressions are supported too, also those in Ansible conditionals (when,
failed_when, changed_when, check_mode), which are not placed in double
curly braces.
The screenshots and animations presented in this README have been taken using the One Dark Pro theme. The default VS Code theme will not show the syntax elements as distinctly, unless customized. Virtually any theme other than default will do better.
Validation
While you type, the syntax of your Ansible scripts is verified and any feedback is provided instantaneously.
Integration with ansible-lint
On opening and saving a document, ansible-lint is executed in the background
and any findings are presented as errors. You might find it useful that
rules/tags added to warn_list (see
Ansible Lint Documentation)
are shown as warnings instead.
Smart autocompletion
The extension tries to detect whether the cursor is on a play, block or task etc. and provides suggestions accordingly. There are also a few other rules that improve user experience:
- the
nameproperty is always suggested first - on module options, the required properties are shown first, and aliases are shown last, otherwise ordering from the documentation is preserved
- FQCNs (fully qualified collection names) are inserted only when necessary;
collections configured with the
collectionskeyword are honored. This behavior can be disabled in extension settings.
Auto-closing Jinja expressions

When writing a Jinja expression, you only need to type "{{, and it will be
mirrored behind the cursor (including the space). You can also select the whole
expression and press space to put spaces on both sides of the expression.
Documentation reference
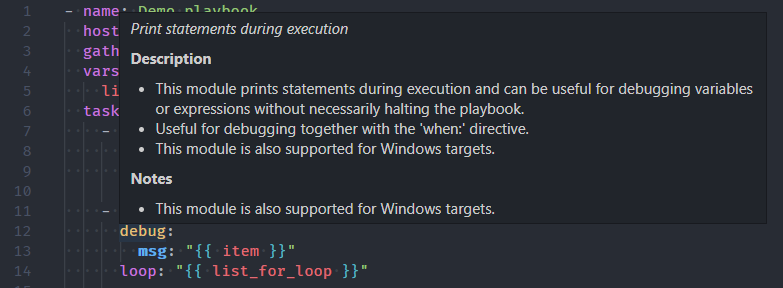
Documentation is available on hover for Ansible keywords, modules and module
options. The extension works on the same principle as ansible-doc, providing
the documentation straight from the Python implementation of the modules.
Jump to module code
You may also open the implementation of any module using the standard Go to
Definition operation, for instance, by clicking on the module name while
holding ctrl/cmd.
Ansible Lightspeed with watsonx Code Assistant
AI based Ansible code recommendations
Requirements
- Ansible 2.9+
- Ansible Lint (required,
unless you disable linter support; install without
yamllint)
For Windows users, this extension works perfectly well with extensions such as
Remote - WSL and Remote - Containers.
If you have any other extension providing language support for Ansible, you might need to uninstall it first.
Configuration
This extension supports multi-root workspaces, and as such, can be configured on any level (User, Remote, Workspace and/or Folder).
ansible.ansible.path: Path to theansibleexecutable.ansible.ansible.reuseTerminal: Enabling this will cause ansible commands run through VS Code to reuse the same Ansible Terminal.ansible.ansible.useFullyQualifiedCollectionNames: Toggles use of fully qualified collection names (FQCN) when inserting a module name. Disabling it will only use FQCNs when necessary, that is when the collection isn't configured for the task.ansible.validation.lint.arguments: Optional command line arguments to be appended toansible-lintinvocation. Seeansible-lintdocumentation.ansible.validation.lint.enabled: Enables/disables use ofansible-lint.ansible.validation.lint.path: Path to theansible-lintexecutable.ansible.ansibleNavigator.path: Path to theansible-navigatorexecutable.ansible.executionEnvironment.containerEngine: The container engine to be used while running with execution environment. Valid values areauto,podmananddocker. Forautoit will look forpodmanthendocker.ansible.executionEnvironment.containerOptions: Extra parameters passed to the container engine command example:--net=hostansible.executionEnvironment.enabled: Enable or disable the use of an execution environment.ansible.executionEnvironment.image: Specify the name of the execution environment image.ansible.executionEnvironment.pull.arguments: Specify any additional parameters that should be added to the pull command when pulling an execution environment from a container registry. e.g.--tls-verify=falseansible.executionEnvironment.pull.policy: Specify the image pull policy. Valid values arealways,missing,neverandtag. Settingalwayswill always pull the image when extension is activated or reloaded. Settingmissingwill pull if not locally available. Settingneverwill never pull the image and setting tag will always pull if the image tag is 'latest', otherwise pull if not locally available.ansible.executionEnvironment.volumeMounts: The setting contains volume mount information for each entry in the list. Individual entry consist of asrc: The name of the local volume or path to be mounted within execution environment.dest: The path where the file or directory are mounted in the container.options: The field is optional, and is a comma-separated list of options, such asro,Zansible.python.interpreterPath: Path to thepython/python3executable. This setting may be used to make the extension work withansibleandansible-lintinstallations in a Python virtual environment. Supports ${workspaceFolder}.ansible.python.activationScript: Path to a customactivatescript, which will be used instead of the setting above to run in a Python virtual environment.ansible.completion.provideRedirectModules: Toggle redirected module provider when completing modules.ansible.completion.provideModuleOptionAliases: Toggle alias provider when completing module options.ansibleServer.trace.server: Traces the communication between VS Code and the ansible language server.ansible.lightspeed.enabled: Enable Ansible Lightspeed.ansible.lightspeed.URL: URL for Ansible Lightspeed.ansible.lightspeed.suggestions.enabled: Enable Ansible Lightspeed with watsonx Code Assistant inline suggestions.ansible.lightspeed.modelIdOverride: Model ID to override your organization's default model. This setting is only applicable to commercial users with an Ansible Lightspeed seat assignment.ansible.lightspeed.disableContentSuggestionHeader: Do not include code comment crediting Ansible Lightspeed when accepting a Lightspeed suggestion.
Data and Telemetry
The vscode-ansible extension collects anonymous usage data
and sends it to Red Hat servers to help improve our products and services. Read
our
privacy statement
to learn more. This extension respects the redhat.telemetry.enabled setting,
which you can learn more about at
redhat-developer/vscode-redhat-telemetry#how-to-disable-telemetry-reporting
Known limitations
- The shorthand syntax for module options (key=value pairs) is not supported.
- Nested module options are not supported yet.
- Only Jinja expressions inside Ansible YAML files are supported. In order to have syntax highlighting of Jinja template files, you'll need to install other extension.
- Jinja blocks (inside Ansible YAML files) are not supported yet.
Contact
Credit
Based on the good work done by Tomasz Maciążek