Getting Started With Molecule
The following guide will step through an example of developing and testing a new Ansible collection. After reading this guide, you should be familiar with the basics of how to use Molecule and what it can offer.
-
Create a collection
One of the recommended ways to create a collection is to place it under a
collections/ansible_collectionsdirectory. If you don't put your collection into a directory namedansible_collections, molecule won't be able to find your role. -
cd to the
rolesdirectory in your new collection. -
Initialize a new role for this collection.
-
Add a task under
my_role/tasks/main.yml. -
At the root of your new collection, create a directory named
playbooks. -
cd to the
playbooksdirectory and create a new playbook calledmy_playbook.yml -
Adding Molecule to the Collection
-
Create a new directory in your collection called
extensions. -
cd to the
extensionsdirectory and initialize a new default molecule scenario.
-
Before moving to test the playbooks or roles, the sections below provide information related to Scenarios.
Molecule Scenarios
Scenarios are the starting point for a lot of powerful functionality that Molecule offers. For now, we can think of a scenario as a test suite for roles or playbooks within a collection. You can have as many scenarios as you like and Molecule will run one after the other.
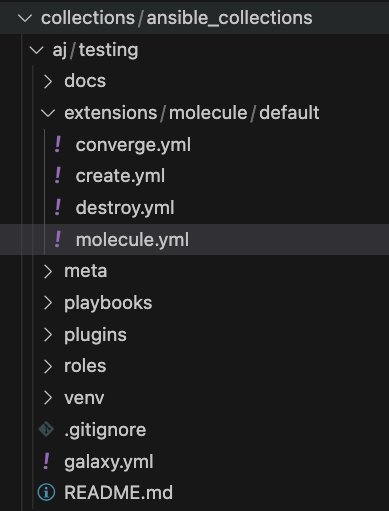
The Scenario Layout
Within the molecule/default folder, we find several files and
directories:
create.ymlis a playbook file used for creating the instances and storing data in instance-configdestroy.ymlhas the Ansible code for destroying the instances and removing them from instance-configmolecule.ymlis the central configuration entry point for Molecule per scenario. With this file, you can configure each tool that Molecule will employ when testing your role.converge.ymlis the playbook file that contains the call for your role. Molecule will invoke this playbook withansible-playbookand run it against an instance created by the driver.
Note
If the verify.yml playbook does not explicitly include_role your
role, the library and module_utils provided by your role are not
available in the playbook by default. If you need those for testing but
would like to avoid re-running your role, consider adding an empty task
file init.yml to your role and use tasks_from to include your role
in the verify.yml playbook:
Inspecting the molecule.yml
The molecule.yml is for configuring Molecule. It is a
YAML file whose keys represent the high-level
components that Molecule provides. These are:
- The dependency manager. Molecule uses galaxy development guide by default to resolve your role dependencies.
- The driver provider. Molecule uses the Delegated driver by default. Molecule uses the driver to delegate the task of creating instances.
- The platforms definitions. Molecule relies on this to know which instances to create, name and to which group each instance belongs. If you need to test your role against multiple popular distributions (CentOS, Fedora, Debian), you can specify that in this section.
- The provisioner. Molecule only provides an Ansible provisioner. Ansible manages the life cycle of the instance based on this configuration.
- The scenario definition. Molecule relies on this configuration to control the scenario sequence order.
- The verifier framework. Molecule uses Ansible by default to provide a way to write specific state checking tests (such as deployment smoke tests) on the target instance.
Run a full test sequence
Molecule provides commands for manually managing the lifecycle of the instance, scenario, development and testing tools. However, we can also tell Molecule to manage this automatically within a scenario sequence.
cd to the extensions directory.
The full lifecycle sequence can be invoked with:
Molecule full lifecycle sequence
└── default
    ├── dependency
    ├── cleanup
    ├── destroy
    ├── syntax
    ├── create
    ├── prepare
    ├── converge
    ├── idempotence
    ├── side_effect
    ├── verify
    ├── cleanup
    └── destroy
Note
It can be particularly useful to pass the --destroy=never flag when
invoking molecule test so that you can tell Molecule to run the full
sequence but not destroy the instance if one step fails.
If the --platform-name=[PLATFORM_NAME] flag is passed or the
environment variable MOLECULE_PLATFORM_NAME is exposed when invoking
molecule test, it can tell Molecule to run the test in one platform
only. It is useful if you want to test one platform docker image.
Test the collection playbook or role
So you now have an isolated test environment, and can also use it for live development, by running molecule converge.
It will run through the same steps as above but will stop after the converge action.
Then you can make changes to your collection or the Converge play, and then run molecule converge again (and again) until you're done with your development work.
One of the default files created as part of the initialization is the converge.yml file.
This file is a playbook created to run your role from start to finish.
This can be modified if needed but is a good place to start if you have never used Molecule before.
To test the playbook, we update converge.yml:
---
- name: Include a playbook from a collection
  ansible.builtin.import_playbook: foo.bar.my_playbook
Similarly, if we want to test only the role instead of a playbook in converge.yml file:
---
- name: Include a role from a collection
  hosts: localhost
  gather_facts: false
  tasks:
    - name: Testing role
      ansible.builtin.include_role:
        name: foo.bar.my_role
        tasks_from: main.yml
cd to the extensions directory.
The above command runs the same steps as molecule test for the default scenario, but will stop after the converge action.